Programming Church
This repo contains a bunch of lesson started in January 2018 for a little band of ‘engineers from other disciplines’ (including my nieces) to learn software development and hardware device control using Python and Raspberry Pi
Tools used:
For these lessons we will rely on core material from the following online material:
- Udemy Complete Python Programming Course I like this one because it starts people out using Jupyter notebook
- Packt Beginning Python Video This one is more programmer centric
January 1st session - Getting Started with Jupyter Notebook
In this session we’ll review your installation of Anaconda and PyCharm. And do some simple things with Jupyter notebook. Jupyter notebook will be familar to you from your MATLAB experience from your engineering courses.
Prerequisites
Sections 1 - 3 of the Udemy Complete Python Programming Course ***
January 7th session - User Input, Dictionaries
In this session we’re going to review user input, dictionaries, and introduce for loops.
Prerequisites
Sections 4 and 5 of the Udemy Complete Python Programming Course
Exercises
- The exercises for the session can be found in this the lessons folder of this repo at: Jupyter Notebook
- The stand alone code is available in the src folder of this repo at: wordcount.py
January 15th & January 21st session - Loops, Functions and Modules
In this session we’re going to begin our discussions about functions and modules
Prerequisites
- Sections 6 and 7 of the Udemy Complete Python Programming course
- Section 6 and 7 of the Packt Beginning Python Video course
- Review sections 1-5 of the Packt Beginning Python Video course - most of this will be a review of material from the Udemy course
Exercises
- The exercises for the session can be found in this repo at: Text Analytics Functions.ipynb
January 28th Session - Using other peoples code
Kids now days don’t understand how lucky they are to have such broad collection of third party code to work with. You can find a library of code someone else has written to do just about anything you can imagine now days. In this session we’re going to learn how to use add-on packages in Python.
Prerequisites
- Read about using Python packages by reading the two following articles
- Read about the Python Standard Libraries Don’t worry about memorizing all of them or learning how to use all of them, for now just get familar with what’s available. Also pick one or two you want to explore.
- Read about Matplotlib Again don’t worry about learning how to use all of Matplot, just get familar with what’s available. We’ll start to explore it with some labs.
Exercises
We’ll start the day learning how to plot the results of our analysis on a graph using Matplotlib. Then our main exercise for this session will build on our text analytics theme. We’ll move away from simple user input and instead get the text for our analysis from files using capabilites of the python standar libraries.
- Our first exercise is to learn to use Matplotlib the exercise for that is Jan 28 - Matt Plot Experimentation.ipynb
- Our second exercise using text analytics is in Jan 28 - File Reading Experiements.ipynb
February 4th Session - It’s time for Pi
We’ve been learning the core of the Python language for a month now. Let’s change it up and have some fun and build our first Raspberry Pi project.
Prerequisites
- Get a Raspberry Pi starter kit
- Read the Packt Python Programming with Raspberry Pi book. (or at least as much of it as you can)
- Download GitHub for Windows. After installing GitHub for Windows - reboot your system. Then open a command window and type git and you should see a list of github options.
- Read the GitHub Tutorial
Exercises
Exercise 1 - Get your Raspberry Pi running
- If you haven’t already, we’ll format your memory card and load NOOBS. Follow the instructions in the How to get NOOBS tutorial
Exercise 2 - VNC to your Raspberry Pi
The next thing you need is to be able to remotely control your Raspberry Pi from your laptop.
- To do that you need to install VNC on both your latptop and your Raspberry Pi. Follow the step in Raspberry Pi VNC Tutorial
- Install Real VNC Viewer on Windows
Exercise 3 - Sharing Code with your Raspberry Pi via Github
- Create a new repository with a very simple README stating this is your first Raspberry Pi project.
- On your laptop use git clone to clone your new repository into your code directory.
- Using Atom or Pycharm create a simple Python program that prints the digits 1 - 10
- Commit those changes and push them back to the repo
- On your raspberry pi clone your new repository into a directory called code
Exercise 4 - built a circuit to connect a LED to a GPIO Pin
There is a great tutorial on this at ThePiHut Don’t worry much about the code, we’ll get the code in the next exercise
Exercise 5 - Code to Control the GPIO pins of your Raspberry PI
- We will be using the Gpiozero library for all of our code. They have a great documentation and recipies site
- fork my repository at https://github.com/JohnFunkCode/RaspberryPiTutorial-1 if you need help see: https://help.github.com/articles/fork-a-repo/
- clone your repository to laptop
- change the code to make it blink the LED 10 times in a for loop
- push it back to github and clone it down to your Raspberry Pi
Exercise 6 - Extra Credit - More advanced interactions with Rasberry Pi
Using VNC to remote to the Rasberry Pi is easy and it gives you a lot of functionality. Pulling Code from Github is also a very good practice and it allows you to use more powerful tools on your laptop in your development. But you should also know the quick and dirty ways to interact with the Rasberry Pi. The fastest way to get access to these tools is to install Ubuntu Linix on you Windows 10 laptop. This sounds complicated, but in the Windows 10 Fall Creators update Microsoft made it really easy. Just follow the steps on the Developer’s Tidbits blog
One you have it open you can learn to use a few unix tools to interact with your Raspberry Pi
- SSH - SSH allows you to open a remote terminal session to your Raspberry Pi - Here is a good tutorial
- SCP - SCP allows you to directly copy files to and from your Raspberry Pi - Here is a good tutorial
February 11th Session - Simple Components with Raspberry Pi
Now that we got the Raspberry Pi’s running and know how to get code on them via Github we’re going to continue last week’s exercises to build some simple circuits and write a bunch of code on the Raspberry.
Exercise 1
Build a circuit to connect an LED to a GPIO pin and write some code to make it blink. Look back at Excercise 4 from last week for more details
Exercise 2
Build a circuit to connect a bunch of LEDs to GPIO pins and write some code to make them race up and down. Example code for this is in src/gpiozero-racingLED.py
Excercise 3
Play with Pulse Width Modulation to vary the duty cycle you put on your LEDs to make them glow etc. Example code for this is in src/gpiozero-pwmLED.py
Excercise 4
Add some buttons to your LED circuit and write some code to do things with them. I suggest first just making sure your buttons work, then make them start your string of LEDs racing. Example code for this is in src/gpizero-buttons.py (hint - use the GPIOZero button.whenpressed() method. There is a great example in the GPIOZero Recipies
February 17th Session - Creating Web UI with Flask - Part 1
After taking a brief side trip to explore building circuites and programming hardware with our Raspberry Pi’s its time to get back to more code. This week we’re going to begin creating web UI’s in python so our code can be more interactive. There are a lot of new concepts for you to learn so this will most likely take a few sessions.
Homework Assignment: To get an understanding of where we’re going listen to the entire Flask Tutorial Step by Step course on Udemy. This first time through, don’t try to do any of the lectures, I just want you to get a broad understanding of what the Flask framework does so we can work through it piece by piece.
We are also going to step up our game and start working with Pycharm which is a more professional integrated development environment (IDE). Please review the Pycharm Quick Start Guide
Another handy reference you’ll need is the W3Schools HTML web development site.
Solutions
My solutions for these exercises are in my flask-textanalytics repo
Exercise 1 - building your first flask application
Using Pycharm we’re going to create a new project and build a very simple flask app. I like the folder structure Santiago uses to organize his work in the Udemy Flask Tutorial Step by Step, so we’ll mimic it.
- First create a new repo named flask-textanalytics in github. Make sure to select everything at the bottom to create python get ignor, and an MIT licences, and generate a README.md file. Clone this project into your code directory on your computer.
- Next create a new project in Pycharm - put in in your code directory in a directory called flask-textanalytics
- Create a Python file for the main driver of your flask applicaton in the root of the project following the pattern of Flask Tutorial Step by Step - Section 3
- Create a libraries module in your application to house the code of the application. In the library module create a python file with a route that handles the url route “/” by simply returning a string saying “hello world”
- once the code is working check it into Github
Exercise 2 - rendering an html template
In this exercise we’ll extend what you’ve built so far to setup a simple flask template and pass it a variable to include in the information it outputs.
- Add the a route to handle the “/test” route with a function that calls render_template to render a file called index.html
- create a file called index.html in the templates directory
- pass a variable with a string containing your name in it to the template and have it include your name someone in the body of the data returned.
- once the code is working check it into Github
Exercise 3 - Rendering a form and displaying the user’s input
In this exercise we’ll extend what you’ve built so far to render an html form to gather two strings from the user. When the user posts that data, we’ll render another template to display the two string.
- Add a route to handle the “/textanalytics” route with a function that renders either a form, or an html document with results depending on if it gets a GET or a POST method.
- Add two html documents to your templates directory one called “textanalytics_form.html” with an input form in it, and one called “textanalytics_form_results.html” to display the two strings gathered by the form.
- once the code is working check it into Github
Exercise 4 - Hook up your text analytics funcitons from a few weeks ago
In this exercise we’ll use the text anlytics module you wrote a few weeks ago to calculate the words in common between the two strings the user inputs into the web forms from the previous exercise.
- Copy your text analytics code into a directory called model in your library directory
- Call you text analytics union method from the “POST” method of your function that handle the “/textanalytics” route and pass the results to the render template code that displays your textanalytics_form_results template.
- Add code into your template to display the dictionary returned by your textanalytics.union() function.
- once the code is working check it into Github
February 25th Session - Playing with WebUI’s
Ok, you’re on your own this week. It’s your chance to get creative playing with building simple web UI’s. Spend some time before class this week to explore some of my suggestions below to see what you want to try to build this week. Here are some of my suggestions:
- Build variations on your text analytics code. We’ve surfaced the Union function, but how about the other funcitons?
- Dress your templates up a bit with fancier HTML. Megan knows HTML pretty well, and there is a great HTML Tutorial at w3schools.com. See if you can make one of your templates look presentable.
- Build a UI for your racing lights on your rasberry pi. There is endless combinations you can build:
- Make the lights race up, or down
- Show the user a bunch of radio buttons and let them choose what LED to light up, or even use a pulldown menu to let them choose to make it light solid, blink, or even make it glow using the Pulse Width Modulation PMWLED methods
Home Work:
- Listen to Cornilia Davis’s talk about Women and Technology
- Write code!!!!
March 3rd Session - Objects and More Web UI (We probably won’t get through this section in 1 week)
Today we’ll start with more pure Python code. It’s time you learn the next step in oranizing your code by working with classes. Classes are the basis for Object Oriented programming which is a very important topic to master because it helps decompoze complex ideas into simpler more usable code. After that we’ll go back to working with a more sophisticated flask web app to control your raspberry Pi.
Homework Assignment:
- Listen to the recording on Classes in Python that I provided.
- Learn about Github tagging and releases. I abuse the tagging mechanism to show the stages of development in these lessons. Here are a few resources to help you learn about tagging:
- https://git-scm.com/book/en/v2/Git-Basics-Tagging
- https://www.youtube.com/watch?v=90ynNkDzaNY
Exercise 1
Write a class to encapsuate the functionality of your Raspberry Pi LED contraption. It should do the following:
- Initialize itself by setting up all the LEDs we need to control.
- Provide a led_on() method to turn on individual LEDs
- Provide a led_off() method to turn off individual LEDs
- Provide a race_up() method to make the leds race up
- Provide a race_down() method to make the leds race down
- Provide a dance_randomly() method to make the leds dance on and off randomly
- Your class should also include tests when the file is run by itself using the if __name__ == “__main__“ trick you’ve learned.
Solution
My solution can be found at in my flask-pi-led-control repo with the WithPI tag in the library/raspi directory.
Exercise 2
Create a static html site with the following pages:
- index.html - acts as the home page and has a menu to get to all the other pages
- individual.html - has a menu to get to the other pages and a text box with on/off radio buttons to allow the user to control individual LEDs.
- group.html - has the menu, and a bunch of radio buttons to allow a user to turn on or off any of the LEDs at once.
- patterns.html - had the menu, and buttons to allow the user to make the LEDs race up, race down, or dance randomly.
Solution
My solution can be found at in my flask-pi-led-control repo with the static-html tag.
Exercise 3
Turn your static html site into a flask application. You’ll need to do the following:
- Setup a base flask app by copying the structure of our previous flask examples
- Setup a libraries directory for our code and templates
- create a driver app called run_app.py in the root of the project
- added requirements.txt to make sure the environment include Flask
- Moved the static html into the templates directory
- Create a file called flask_pi_led_controll_app.py with all the routes for the app.
- Moved the stylesheet into /library/static/styles and changed all the html files to refer to it.
Solution
My solution can be found at in my flask-pi-led-control repo with the FlaskFromStaticHTML tag.
Exercise 4
Wire in your class that encapsulates the functionality of your Raspberry Pi LED contraption into your flask application. A few tips for doing this include:
- Set defaults for all your radio buttons in the HTML files, to make processing the forms easier.
- Create a mock-up of your rasberry pi contraption class with all the GPIO handling stripped out. This will make it easier to test on your PC before you move things to your raspbery pi. I did this by simply making a copy of my class file and stripped out anything GPIO related to create a mock object that implements all right methods.
Solution
My solution can be found at in my flask-pi-led-control repo with the WithPi tag.
April 15 Session - Wrap up Flask Pi LED Contraption
We’ve spent several weeks getting our Flask based Pi Contraption that flashes LEDs by using a clean object design and an HTML interface. That’s actually quite an accomplishment. It’s non-trivial and it has many apects of a real-world project built into it!!!! Great Job!
Exercise - Mobile responsive CSS
Before moving on we’ll talk a little bit more about CSS styling for mobile devices. I’ve pulled all the HTML and CSS out of my Pi LED Contraption project and put it on my website at: http://www.johnfunk.com/responsive/
- look it it with Chrome’s developer tools
- Dig into the CSS a bit deeper and notice the I have a wrapper class that I apply to the Body. Also notice that I also use a variable font to help change the font size on various devices. This is a very simple setup that scales the font size to make things work better across many different devices.
Look at the following articles to learn more about how to make things look better on mobile:
- https://css-tricks.com/fun-viewport-units/
- https://www.smashingmagazine.com/2016/05/fluid-typography/
- https://css-tricks.com/viewport-sized-typography/
April 22 Session - Begining Our first IoT project
Today we’ll wrap that up and move on to an even more intersting and more realworld project. We’re going to working on our first IoT project using techniques that IoT startup companies in their projects. Our little project will use an Ada Fruit ADXL1345 Accelarometer to detect motion and report that back to a cloud based collection center where we can analyze the data collected from all the devices in our little internet of things world.
Exercise 1 - Get started with the ADXL345 Accelerometer
First read the instructions about using the ADXL345 accelerometer in the manual of your Sunfounder kit. In my version of the kit it’s exercise 14. Your version might be a bit different.
-
Wire up the Accelrometer circut according ot the manual in your sunfounder kit. I recommend putting this on a different breakout board. But you might put in on the same board as your LEDs if you want to show them all off together and don’t mind a more complicated circuit.
- Get the sample code working
-
The core example on the Sunfounder site doesn’t work: https://www.sunfounder.com/learn/Super_Kit_V2_for_RaspberryPi/lesson-14-adxl345-super-kit-for-raspberrypi.html
-
I found it’s better to go direct to Adafurit’s github at: https://github.com/adafruit/Adafruit_Python_ADXL345
-
However, it doesn’t clearly explain all the pre-requisits. Read the following article on stack exchange (and pay attention to the last line) https://raspberrypi.stackexchange.com/questions/14153/adafruit-i2c-library-problem?utm_medium=organic&utm_source=google_rich_qa&utm_campaign=google_rich_qa
- Here are the steps I followed to get things running:
sudo apt-get update
sudo apt-get install python-smbus
sudo apt-get install i2c-tools
Then you need to change your raspberry pi configuration:
sudo raspi-configIn the next screen choose, in order:
- Interfacing Options
- I2C - enable I2C
May 6 Session - flask-pi-iot
This week we’ll start by debugging any circuit or setup problems with the ADXL345 accelerometer. From there we’ll begin to build an appliction for the Raspberry Pi that reads data from the ADXL345 and sends it via an HTTP post to a Flask application running on your laptop.

Exercise 1 - Raspberry Pi code
Use the Requests library and the Adafruit_Python_ADXL345 libary to write code for the Raspberry Pi that reads the sensor and uses an http post to send the x,y,z data to a flask app on your laptop.
Solution
My solution can be found at accelerometer_post.py
Exercise 2 - Flask App
Using what we’ve learned about Flask so far write a Flask app that runs on your laptop. It should have a route that handles the data your Raspberry Pi code posts to your app and print it to the console. Also create a route for index.html to show something if someone goes to your app with a browser (we’ll expand the UI in the future).
Solution
If you need help remembering how to buidl a Flask app, look back at your last project code before simply using my solution. My solution can be found at fask-pi-iot
May 20 Session - flask-pi-iot part 2: To the cloud!
Exercise 1 - Create an account on Pivotal Web Services
Go to run.pivotal.io and create an account.
Exercise 2 - Install the Cloud Foundry CLI
Follow the steps in the Pivotal Web Services Documentation to install the Cloud Foundry CLI and read a bit to get familar with it.
Exercise 3 - Read about building Flask apps on Pivotal Web Services
Read the article WebApp in 5 minutes: Deploying a Flask Python App to Pivotal Web Services.
Exercise 3a - Read the Ian Huston’s aritcle about using Python with Cloud Foundry
Read Ian Huston’s article and watch his video about Python Cloud Foundry Examples
Exercise 3b - Read the docs on the Python Buildpack for Cloud Foundry
Read the documentation on the Python Buildpack for Cloud Foundry
Exercise 4 - Deploy your the flask poriton of your Flask Pi IoT project to Pivotal Web Services
Using the article in exercise 3 deploy your application to Pivotal Web Services.
- You will have to create an requrements.txt file a Procfile and a runtime.txt file as described in the article.
- You will also have to change the ip address your flask app listens on to 0.0.0.0 which on Unix means any ip this machine is configured to use.
- The last thing you need to do is change the URL that your Raspberry Pi code uses to post data to the flask app it will be the new url show in the route informaiton in Cloud Foundry.
Exercise 5 - install the Simple Rest Client chrome extension
To help test our web services applications it’s helpfull to install the Simple Rest Client chrome extension. Or something similar. Using this tool you can send arbitrary data to your web applicaiton.
Exercise 6 - Read the Curl tutorial
Curl is a linux command that allows you to make HTTP requests from the command line. It’s a handy tool for testing web applicaitons so you should learn to use it effectivly. The Curl Tutorial is a great place to start.
May 27th Session - code,code,code!
For the last few weeks we’ve done a lot, but we haven’t spent much time honing our coding capabilities. We built a new circuit, we setup the base for a new Flask project, and we learned how to run our flask apps on Cloud Foundry. That was all very significant, but this week we are going to get back into the code. The goal for this week is to get the IoT client code on our Raspberry Pi send the Pis serial number, the time stamp, and the x,y,z data from our Accelerometer to cloud foundry.
TDD - Test Driven Development
In some of our early exercises on creating classes in Python I introduced the concept of TDD - Test Driven Design. We are going to build on that as we move forward using the Python unittest framework.
Review the Unit testing framework documentation and this fun tongue-in-cheek video by Socratica on the unittest framework. There is also a chapter on Test-Driven Development in the book “Expert Python Programming” which is part of the Python Humble Bundle of books that you have.
Exercise 1 - Create a test to test code that would return the Raspberry Pi serial number.
Before we write code, lets write a test to help us make sure we know that we want the code does what we want. Your assignment is to write a unittest to test a function that returns the Raspberry Pi serial number. A simple test could just to make sure the serial number isn’t empty.
Exercise 2 - Create a function to get the serial number from Raspberry Pi.
As a team, we have a small fleet of Raspberry Pis. When they send their data to the cloud we want a way to differentiate which one send the data. Fortunately each Raspberry Pi has a unique serial number that we can obtain programmatically. There are a lot of articles that discuss how to get the serial number. Google “Raspberry Pi serial number python” and read a few articles to make sure you understand the topic. Your assignment is to create a function inside your Pi Client code that returns the serial number, and incorporate this into the data that you post to the server.
Hint: There is a very concise sample that I like at Getting Your Raspberry Pi Serial Number Using Python.
More advanced enhancements
It would be more interesting if everyone’s Raspberry Pi sent data to everyone’s server. To do that we’ll adapt our Pi client code to post it’s data to everyones’s code running on Cloud Foundry. To do this build a list of servers, and adapt your code to add a for loop to send to post data to each of those server.
Exercise 3 - Create a test to test your list of servers
Before we write the code to return a list of servers, think about how you would test that it works. Your assignment is to write unittests to make sure things do what you want. I suggest making sure you have a function to get the list of servers. And make sure the list of servers has at least some data.
Exercise 4 - Implement the code for your list of servers
Write the code to return a list of servers. Then build that code into your Pi Client so it sends data to all the servers in the list.
Exercise 5 - Test that the server responds before sending data to it.
Our last exercise for the day is to test that the server responds before sending data to it. I recommend testing the connection before you drop into a loop reading the Accelarometer and sending data to the server - but there are lots of ways you could implement this.
Solution:
My solution for this set of exercises is in the v2.0 tagged version of my flask-pi-iot project
June 3rd Session - More code!
Last week I realized that you just need more time writing code so the theme for today is more code. We’re going to write a class to hold all accelerometer data that were collecting from the Raspberry Pi. Today you won’t have to worry about getting your code over to the Raspberry Pi to test. All of today’s code can be tested on laptop before we push it to Cloud Foundry.
Exercise 1 - Create a new Python Package called pi_iot_data.
We’ll start by creating a directory inside your library directory called pi_iot_data and create the shell of a class called pi_iot_data.py and a unittest for it. This will modularize our design and let us evolve the code to store data over time.
Exercise 2 - Write a test
Write a test that exercises a method in your new class that adds an accelerometer reading to a collection. I recommend that you make sure your tests validate that there is more data in your collection after you add a reading than there were to start with.
Exercise 3 - Write code to make your tests work
Add some code to your class to add a reading with the accelerometer data from the Raspberry Pi.
Exercise 4 - Write another tests
Write a test to ensure code to get all the readings you have collected from the Raspbery Pi works properly. One fast test could make sure that the code returns an expected number of readings. For example add 2 readings and make sure the code returns 2 readings.
Exercise 5 - Write code to make your test work
Add code to your class to get all the readings you have collected from the Raspberry Pi.
Solution:
My solution for this set of exercises is in the v3.0 tagged version of my flask-pi-iot project
June 10th & 17th Sessions - Connect pi-iot-data to Flask UI
Next week we’ll connect your pi-iot-data to your Flask UI. To do this you’ll update your main application so the data that comes in gets added to your collection. Then we’ll modify the alldata.html template code to display the collected data.
Homework:
Go back and re-listen to Santiago Basulto’s “Flask Tutorial - Step by Step” on Udemy. Everything you need to know for the June 10th session is discussed in that class.
Exercise 1 - Connect your add_reading method to the /test route
The first thing to do today is to connect your data storage object to the /test route in your flask_pi_iot_app.py in your library folder. To do this just take the data out of the request.form data and call your data objects add_reading method.
Exercise 2 - Connect your get_all_readings method to the /alldata.html route
Now that you have data it’s time to display it. We’ll connect it up to the /all.data.html route. To do this you’ll have to get the data from your data storage object and pass it to the render_template method.
Exercise 3 - Render the data in your alldata.html template
To do this you’ll need to use the Jinja template language to display all of the data. I suggest starting with very simple html formatting first then move it to a table.
### Solution: My solution for this set of exercises is in the v4.0 tagged version of my flask-pi-iot project
June 24th Sessions - Make the Flask-Pi-IOT Raspberry Pi Client More Robust
This week we’re going to go back and make the Raspberry Pi client code for our Flask-Pi-IOT more robust. It currently just tries to send data to a bunch of server. But what if those servers aren’t available, or what if they start as not available but start working as our Pi’s are collecting data? To start we’re going to talk about exception handling with try-catch blocks.
Homework:
To get ready to work on the Pi Client code read the following material:
-
Read the article “How To Use Break, Continue, and Pass Statements when Working with Loops in Python 3”
-
Read the“Errors and Exceptions” section of the Python 3 documentation.
-
Read Chapter 2: Statements and Syntax of the book “Modern Python Cookbook” by Steven F. Lott from the humble bundle books you bought.
Exercise 1 - Write a mock method that runs on your PC to simulate getting accelerometer data.
To make it easier to test and debug your code, write a mock method to simulate getting the accelerometer data. Make it easy to switch between the real code that runs on the raspberry pi and the mock code that runs on your PC.
Exercise 2 - Get a list of server to send data to
Using TDD write a method that returns a list of servers for your PI to send data to.
Exercise 3 - Get a list of valid servers based on the initial list of servers.
Using TDD write a method that returns a list of servers that are currently responding from the initial list of servers. Watch out for calling list.remove() while iterating through that list. This is a subtle bug that can drive you crazy.
Exercise 4 - Put your valid server code to work by sending data to all the valid servers.
Change the loop in your code to send data to all the valid servers. Also make it remove any servers that return errors.
Exercise 5 - Make your code check to see if any of the configured servers are now up and running from time to time.
Change the way your code sends data to occasionally stop and see if any of the configured servers are up and running now. It should still continue to remove any servers that returned errors.
Solution:
My solution for this set of exercises is in the my flask-pi-iot project in the pi_client folder
Bonus Exercise
Cut down the chattiness of your code by only having it send data to the server(s) every minute if the data isn’t changing.
July 29th Session - Externalizing Config Data
Now that we’ve improved our RaspberyPi IOT sensor client code to be more robust, there is one more thing to do before we move on. We need to externalize where we store the list of servers the code uses and remove the hard coded server list from the Raspberry Pi. There are several ways we can do that. We could just move all the configuration data to a separate python file, we could read it from a text file, or we could read it from a YAML file stored on github. But instead we’ll take a little detour and learn about the file format of .jpg image files and have some fun. Just for fun, we’re going to make our little fleet of sensor bots get their data from data hidden in a .jpg file stored in plain sight. I study the dark side, and this is a technique that evil botnets use to get anonymous command and control information without anyone detecting them.
Homework Assignment 1 - Study the code in my getconfig repository
Homework Assignment 2 - Study the following articles about .jpg files
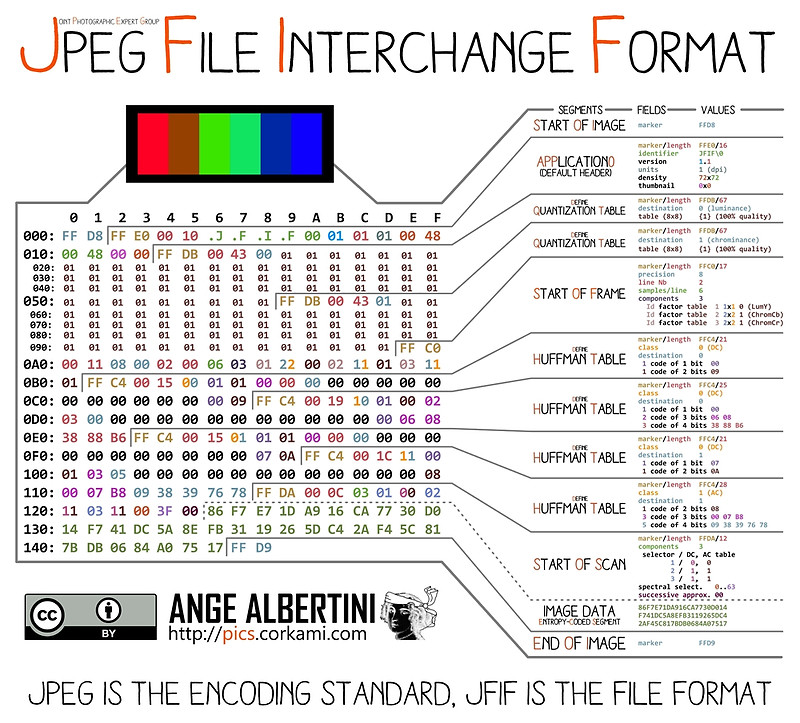
Homework Assignment 3 - Study the code in my iptc_info_cipher repository
This is a nearly production ready library that stores encrypted data into the metadata of a .jpg file.
Exercise 1 - Add code to your Raspberry Pi IOT client to external config data
You can use any method you like, but get the hard coded list of servers out of your code!
August 12th Session - Data Analytics with Pandas
Today we are going to finish up externalizing the config data for our Raspberry Pi code. Then we’re going to end the day with an introduction to Data Analytics with Pandas. To start our experiments with data analytics, we’ll go back to Jupyter notebook to get familiar with Pandas and the method most data scientists use when analyzing data.
Exercise 1 - Finish last week’s code
Finish writing the code for your Raspberry Pi IOT client to external the configuration of the servers the code will send data to.
Lecture Topic 1 - Intro to Data Science with Pandas
Exercise 2 - Using Pandas with Jupyter Notebook
In this exercise you will start working with Pandas in Jupyter notebook.
- Copy the data that I collected with my Raspberry Pi on my drive to Boulder from HomeToWork-08092018.txt in my flask-pi-iot repo. Put this into a /data folder in your project.
- Open Jupyter and create a new notebook in your code/flask-pi-iot folder.
- Follow my experiments in the notebook in my flask-pi-iot repo.
Homework assignment
Sign-up for a free 10 day trail account at www.PluralSight.com and consume the coure “Pandas Playbook:Manipulating Data” by Reindert-Jan Ekker. You should be able to complete this 2 hours 15 minute course before next week, so we can put Pandas to work in our project.
August 12th Session - Your First Data Science explorations with Pandas
Make sure you did your homework for this class! We are going to start exploring data with Panadas using the dataset I recorded with my Raspberry Pi and the Accelerometer board we built on my drive to Boulder. We don’t know a lot about this data so we are going to explore it using Jupyter Notebook to see what interesting things we can find. And along the way, we’ll improve our skills in using Pandas!
Assignment 1 - Read the sample accelerometer data from my trip to Boulder into a data frame.
Assignment 2 - Plot the dataframe as a graph
Assignment 3 - Lets start to learn a bit about the data! Print descriptive statistics (min,max, mean, standard deviation) for the variables in the data.
Assignment 4 - add a column called dx to the dataframe and set all values to 0. We’ll use this in a moment. Right now it’s just gets you familiar with using Pandas notations.
Assignment 5 - add columns for dx, dy, and dz. These values should be calculated as the change in x,y,z from previous row in the data frame.
Note: This is harder! I found it easiest to write a for loop to itterate over the rows. There is probably a more sophisticated way to do this, but keep it simple for now.
Assignment 6 - use pandas.Dataframe.appy to caclulate the sum up dx,dy, and dz.
This is a simple summation across three columns of the same row a dataframe. Σ dx+dy+dz represents the overall magnitude of change the sensor recorded.
Assignment 7 - plot all the values as separate graphs (separate sub-plots)
Assignment 8 - plot just the values of the Σ dx+dy+dz. This seems interesting!
Assignment 9 - display the values where Σ dx+dy+dz is < 4. This represents quiet period where the sensor data didn’t change.
note use pd.set_option(‘display.max_rows’, 8000) to set the number of rows displayed in your dataframe to 8000. This will let you scroll around and see the data.
Assignment 10 - using slicing to examine just the rows between a quiet times.
Assignment 11 - use slicing to look at the timestamp for the quiet times bounding periods of movement.
Assignment 12 - use slicing to plot one of the periods of movement bounded by quiet times
Assignment 13 - write a for loop to iterate through all the periods of movement bounded by quiet times. Call out any that are longer than just a few seconds. Also plot them all on a graph.
Assignment 14 - To cap things off write the new dataframe out to an excel spreadsheet using XlsxWriter.
Solution:
My solution for this set of exercises is in a jupyter notebook in my flask-pi-iot project
August 26th Session - Adding Pandas to your Flask-Pi-IOT code
Last week we got comfortable with Pandas and running more sophisticated experiments Data Science style with Jupyter Notebook. This week we’re going to go back to our Flask-Pi-IOT app and put in a Pandas dataframe as the storage mechanism for the sensor data.
Assignment 1 - Create a new module in your Flask-Pi-IOT project for storing sensor data.
Assignment 2 - Using TDD methods create a new object to store the sensor data using a Pandas dataframe.
This object should expose high-level domain methods to the outside world as part of it’s API rather than exposing Pandas constructs. Good examples include:
- Add a reading
- list readings
- get reading for a given serial number
- get readings for a given date / time range
- etc.
A great question to ask yourself is how will we render the list of readings as html and how will we expose graphs? Pandas provides a method for that, but how to you expose that in your API that other coders would use.
assignment 3 - Hook up your new module to the main flask-pi-iot project.
October 6th & 13 Session - Continue refining your flask-pi-iot project and it’s new Pandas powered data layer.
We’ll continue to refine the flask-pi-iot project and the way it saves data into Pandas. To cap this phase of work off, we’ll also revisit the pi_client portion of the project, and make sure it’s only posting data every second or two if the sensor doesn’t detect motion. However, before we do that let’s take a look at some current news from the security space that is relevant to topics we’ve been working on.
Homework:
- Listen to Episode 683 of the Security Now podcast
At 23:35 minutes in Steve Gibson talks about a new report that shows that Python has risen to the status of the most popular language for hackers, as well as rising in general popularity. Gibson sites an article from Imperva titled The Worlds Most Popular Coding Language Happens to be Most Hacker’s Weapon of Choice and also references an article from The Economist titled Python is becoming the world’s most popular coding language.

Gibson also discussed a detailed anlysis of the VPNFilter malware and notes that the malware extracts an IP for the command and control server it will connect to from the EXIF image metadata from an image stored at Photobucket. This is the technique my iptc_info_ciper code that we discussed during our July 29th lesson on externalizing Config data.
October 21th Session - Saving your data into an Excel spreadsheet
We’ve spent a few weeks working on our new approach of having more abstract data storage objects that use pandas dataframe to saving our IoT data and tightening up the pi_client. Next we’re going to add functionality to write that data to an excel spreadsheet.
- Read the documentation on Working with Python Pandas and XlsxWriter
Coding assignments
Assignment 1 - Save Pandas Dataframe to an Excel spreadsheet
Use Jupyter notebook to write experimental code that creates a simple data frame and save it to an excel spreadsheet.
Solution
A simple example is in my PadasToExcel repo.
Assignment 2 - Save your IoT data to an excel spreadsheet.
Add code to your flask_pi_iot server to save it’s data to an excel spreadsheet every 10,000 readings.
Next Session - Saving Data to Amazon S3 buckets
Homework:
To get ready to save data to Amazon S3 read the following material:
- Read about how to use Amazon S3 by starting at: https://aws.amazon.com/s3/ and setup an account and do their Store and Retrieve a File tutorial
- Read about how to use the AWS SDK for Python Boto3 and particularly pay attention how to read and write data into a bucket.
December 9, 2018 - Winding up Direct File Access, Lets move on to SQL databases.
Today we’ll wrap up our work with writing our data to files, and move on begin to learn about SQL databases. Before we leave this step we do need to get our code that writes to an S3 bucket running on Pivotal Cloud Foundry.
Assignment 1 - Use a Cloud Foundry Service Broker to Connect to AWS
The one additional change we need to make is to stop relying on the AWS api to provide the credentials for our code. This binds us to our laptops and we don’t want that. Instead Pivotal Cloud Foundry uses a technique called Service Brokers to externalize all the configuration information needed to interact with external services like AWS S3. There is a good document that explains service brokers at: https://docs.pivotal.io/tiledev/2-2/stages.html.
For our code we will simply use a user provided service that provides the S3 Bucket, the AWS access key, and the AWS secret key as environment variables to our app. Rather than decoding the Cloud Foundry VCAP Servicesenvironmentt variables ourselves, we’ll use the cfenv library at: https://pypi.org/project/cfenv/. The best doc about the cfenv library is actually provided in the Node.js version of the library at: https://github.com/cloudfoundry-community/node-cfenv/
If you want an example of how to use this library look at my example code at: https://github.com/JohnFunkCode/FlaskUploadToS3/blob/master/flask-s3-upload.py
Exercise 1 - Make your Flask-PI-IOT app run on cloud foundry using a service broker for PCF.
To do this you’ll have to figure out where you want to get the bucket and credentials from the environment, and then you’ll have to change the code that writes to the S3 bucket to pick up the data from the environment variables. I suggest putting this all in the module that stores your data. I also suggest using an if statement to decide if the VCAP services variable exists before using it. If VCAP services isn’t defined, you can assume you are running on your local machine and you can let the Boto3 library get the creds from it’s default location.
Assignment 2 - Begin your SQL Journey
Before SQL databases were in reach of the average developer, I worked with what is known as an ISAM Index Sequential Access Method and B-tree libraries to store and retrieve data. I essentially put myself through college writing systems using the Borland Turbo Pascal Database Toolkit. Then the industry standardized on SQL databases and Oracle grew to dominance and all the worlds data got stored in SQL databases. Now days alternatives have arrived called noSQL databases, but SQL databases are still a core concept you need to master to be a professional programmer now days.
To begin our Journey into SQL databases, we’ll make the most of the work from a great instructor Dr. Charles Severance from the university of Michigan and his course Using Databases with Python on Courcera. We’ll take the not-paid path through the material, and then if you want you can always go back and take the paid path to earn a certification.
Exercise 3 - Sign up for the Coursera Using Databases with Python class and show me you can access the videos.
Exercise 4 - download the SQLLite Database Browser and show me it’s up and running on your machine.
January 13, 2019 - SQL Exercises
Today we’ll start a seriese of SQL exercises to help solidify what you learned in the Coursera Using Databases with Python class. If you haven’t started with it, please do that, Dr. Severance’s lectures are better than what I would provide.
Sidebar discussions - Determining What Platform you are on
As a quick detour from time to time you need to figure out what operating system you are running on. For example in our PiIoT project we want to know if we’re running on the RaspberyPi or on Window. There is a very simple way to do this
import platform
print(platform.uname()system)
- On Windows this returns ‘Windows’
- On the RaspberyPi it returns ‘Linux’
- On the iPhone with Pythonista it returns ‘Darwin’
There is a great example showing what the various platform modules return at https://github.com/easybuilders/easybuild/wiki/OS_flavor_name_version
Sidebar discussion - Critical SQLite Flaw Leaves Millions of Apps Vulnerable to Hackers
The December 18th Security Now 694 podcast alerted me to a critical SQLlite vulnerability. There is a great discussion of the problem in Episode 694 starting at time code 1:48:00. Please go listen to it and run the following commands in a command prompt on your windows machine before we meet.
cd /
dir /s sqllite*.dll
SQL Exercises
These may take several sessions. We’ll see how things go.
Starting with SQLLite DB browser
Create a table with pets and owners tables and do a bunch of sql to get comfortable. Here are the tasks to perform:
- populate both tables via the sqlite db browser’s browse data tab
- do a few of queries to make sure you know how things work
- owners and their pets
- pets and their owners
- owners with no pets
- pets with no owners
- show the number of pet owned by people using a group by clause
- Insert a person with a sql statements
- Insert a pet with a sql statement using a hard coded person id
- Insert a person and a pet in one transaction
Answers:
--People and their dogs
select people.first_name, pets.pet_name from people,pets where people.person_id = pets.owner_id ;
-- People with no dogs
select people.first_name from people where people.person_id not in (select pets.owner_id from pets);
-- or
select a.first_name
 from people a
 left join pets b
 on (a.person_id = b.owner_id)
 where b.owner_id is NULL ;
-- Pets with no owner
select pets.pet_name from pets where pets.owner_id not in (select people.person_id from people) ;
-- use group by to count the number of pets an owner has
select people.first_name, count(pets.pet_name) from people,pets where people.person_id = pets.owner_id group by pets.owner_id ;
-- Insert a person
insert into people (first_name, last_name) values ( 'Katie','Brown');
-- Insert a pet with a hard coded person id
insert into pets (pet_name, owner_id) values ( 'Pickle',4 ) ;
-- But how can we insert a person and a pet at one time use the last_insert_rowid() function and a transaction
begin transaction ;
insert into people (first_name, last_name) values ( 'Shane','Cornell');
select last_insert_rowid();
insert into pets (pet_name, owner_id) values ( 'Mr. Wiggles',last_insert_rowid() ) ;
commit ;
Jupiter Notebook Experiments with SQLite
Simple stuff
- Connect to SQLite
- run pets and people queries
Examples can be found in my SQLiteExperiments repo
Iot Project Experiments
- create an iot table
- insert readings
- run a query to show all readings
- run a query to show all readings by date
- create a table with Raspberry Pi Serial Number and name
- create a query to show all reading by person’s name
PI IoT Project Work
- Write code to put data into a SQL table
- make sure it works with your live PI client
- sidebar include code in your client to detect what platform it’s on
Move it to PCF (next week)
- first lets move all our PCF work into the ProgrammingChurch org that I manage rather than your own personal org.
- provision a mySQL service
- setup a service broker
- make the code adjustments needed to adapt your code to mySQL